Contents
This section is designed to quickly get you started monitoring hosts with GDMA. You'll will perform the steps necessary to configure an existing GroundWork server to support GDMA agents, and install and configure the agent on Linux and Windows hosts. Solaris installations are similar to Linux, with the exception of the location of the agent directories and certain paths. Once you have the basic install working, you can then refer to the GDMA Advanced section of Bookshelf to see how to customize the configuration of GDMA to meet your needs.
- 1.0 Configuring a GDMA Target Server
- 1.1 GroundWork Monitor Target Server: New Installation
- 1.2 GroundWork Monitor Target Server: Upgrade
- 2.0 Starting and Stopping GDMA
- 3.0 Auto Configuration Setup
- 3.1 Theory of Operations
- 3.2 Auto Configuration Operations
- 3.3 Create DNS Entry for gdma-autohost that points to the GroundWork Server
- 4.0 GDMA Setup and Installation
1.0 Configuring a GDMA Target Server
1.1 GroundWork Monitor Target Server: New Installation
This section describes the steps necessary to configure a GroundWork Monitor server to be a Target server for GDMA results, and a source for GDMA configuration data. If upgrading, see the GroundWork Monitor Target Server: Upgrade section below.
Prerequisites
The following prerequisites exist for configuration of a GDMA Target server:
- GroundWork Monitor 6.1 or higher correctly installed
- Communication allowed from GDMA targets on ports 80 (HTTP) or 443 (HTTPS)
- Communication allowed from GDMA targets on port 5667 (NSCA)
- Target server and GDMA monitored hosts clock synchronization - GDMA operation requires a unified time base for Target servers and the monitored systems. This is normally accomplished using an external clock source such as NTP (Network Time Protocol) for all systems. Messages from systems with out of sync clocks may be dropped silently by the Nagios Event Broker (NEB, called Bronx).
- Administrative access and familiarity with GroundWork Monitor and Linux system administration
- Backup of the Monarch database is highly recommended before beginning this operation, (see the System Maintenance section in Bookshelf for details)
NSCA Communication Setup
| It's important to have Target systems and the GroundWork server in sync with respect to time when setting up GDMA. If servers are not in sync, then NSCA messages submitted from the GDMA to the GroundWork server will be dropped by the Event Broker (Bronx). In default logging levels for the Event Broker, these drops are not recorded. |
GroundWork Monitor 6.0 and later uses Bronx to process passive check results. GDMA supports a feature called spooling which will handle network interruptions between GDMA hosts and the GroundWork server.
When that interruption ceases, results are sent back with correct timestamps. To support these timestamps, the Bronx configuration file, /usr/local/groundwork/config/bronx.cfg, and the parameter listener_max_packet_age needs to be updated. Set this value to 900 seconds to allow for 15 minutes of GDMA spooling. Longer durations are possible, but may result in transient overload conditions on the GroundWork server while large data volumes are processed.
Similarly, packets will be dropped by Bronx if they contain a future timestamp. This can be an issue in environments where perfect time synchronization is not possible. Setting the listener_max_packet_imminence parameter will compensate for a small amount of future time variance between the monitored node and the Target server. We suggest leaving the default of 1 second unless this is determined to be a problem in the environment.
Finally, the use_client_timestamp parameter should be left at the default of 1 to allow the timestamp from the monitored node to be used. This is useful in collecting the performance data and graphing it in time series graphs in the interface. If this parameter is set to 0, the server timestamp will be used and graphing may not be accurate.
The following settings are from the Bronx configuration file: /usr/local/groundwork/config/bronx.cfg
| If any changes to the bronx.cfg file are needed, Nagios must be restarted to put them into effect: /etc/init.d/groundwork restart nagios |
# LISTENER MAX PACKET AGE
# The max allowed age, in seconds, of the passive check result received.
# Any older results are dropped to the floor.
# The maximum allowed value is "900" seconds.
# Set the value to "0" to accept passive checks with older timestamps.
# If not specified, the value will be "30" seconds.
listener_max_packet_age=900
# LISTENER MAX PACKET IMMINENCE
# The max allowed "future age", in seconds, of the passive check result received.
# Any newer results are dropped to the floor.
# The maximum allowed value is "900" seconds.
# Set the value to "0" to disallow passive checks with newer timestamps.
# If not specified, the value will be "1" second, which should be just
# enough to allow for possible slight discrepancies which can arise even
# between time-synchronized client and server machines. In general, we
# highly recommend that the site use NTP or similar time-synchronization
# software to tie together the software clocks on disparate machines to
# high accuracy, to prevent misunderstandings about when events actually
# occur. Note that time synchronization for a VM guest machine can be
# problematic; see your vendor's documentation on this topic.
#listener_max_packet_imminence=1
# USE CLIENT TIMESTAMP
# This parameter, if set to a positive value, configures the listener thread
# to use the timestamp in the passive check result received for processing,
# rather than the time on the server when the check result is processed.
# To prevent confusion in handling data from clients which are not
# time-synchronized to the server, such a check result timestamp will be
# automatically overridden and replaced with the server timestamp if the
# passive check result timestamp is found by the server to be in the future.
# If not specified, the value will be "1".
#use_client_timestamp=0
Freshness Checking
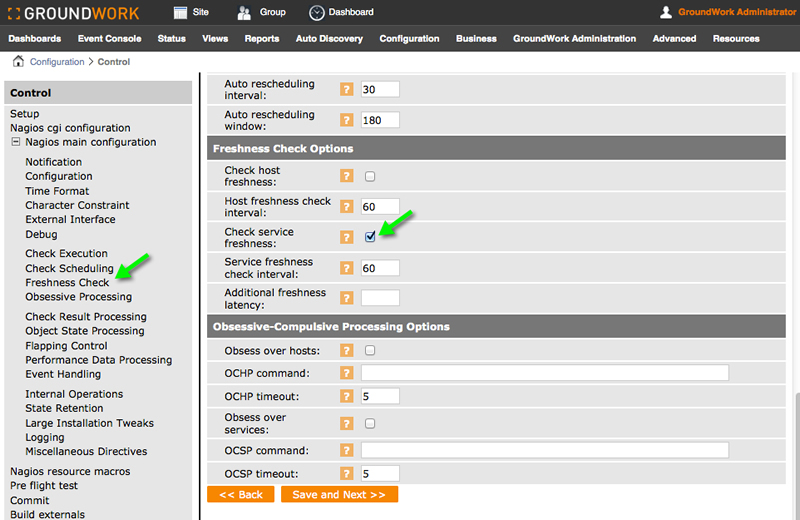
The Check service freshness option determines whether or not Nagios will periodically check the freshness of service results. Historically Freshness checking has not been enabled at a global level in the GroundWork Monitor default Nagios Main Configuration, and this will suppress freshness checking for GDMA-run services. Enabling this option is useful for ensuring that passive checks are received in a timely manner. A checked value means the freshness checking is enabled. This setting should be verified and enabled on a GDMA target server.
- From the Configuration menu options, select Control.
- Expand the Nagios main configuration option, and select Freshness Check.
- Scroll down to the Freshness Check Options area to verify that Check service freshness is enabled (checked), and proceed to save the setting.
Enable Externals
Follow the steps below to enable externals. This will allow to define, add, and execute externals using the GroundWork Monitor Services, Profiles, and Hosts configuration tabs. Your system will then be configured for general GDMA operation. To configure the monitored nodes, see the relevant section under GDMA Setup and Installation below. It is likely that you will wish to take advantage of the auto-configuration functions as well, so be sure to review the section on Auto Configuration Setup.
- From the Configuration menu options, select Control.
- Select Setup, toggle to check the Enable Externals box, and click Save.

1.2 GroundWork Monitor Target Server: Upgrade
This section describes the steps necessary to upgrade an existing GroundWork server with a previous version of GDMA, configured to be a Target server for GDMA agents. If this is a new installation, see GroundWork Monitor Target Server: New Installation above.
Prerequisites
The following prerequisites exist for upgrading a GDMA Target server:
- An existing GroundWork server version 6.0.1 or higher, configured and running with GDMA 1.x or 2.0 or later
- Familiarity with GroundWork Monitor and Linux system administration
NSCA Communication Setup
| It's important to have Target systems and the GroundWork server in sync with respect to time when setting up GDMA. If servers are not in sync, then NSCA messages submitted from the GDMA to the GroundWork server will be dropped by the Event Broker (Bronx). In default logging levels for the Event Broker, these drops are not recorded. |
As covered in the Target GroundWork Monitor: New Installation section above, verify that all the parameters in /usr/local/groundwork/config/bronx.cfg are correct.
GroundWork Monitor 6.0 and later uses Bronx to process passive check results. GDMA supports a feature called spooling which will handle network interruptions between GDMA hosts and the GroundWork server.
When that interruption ceases, results are sent back with correct timestamps. To support these timestamps, the Bronx configuration file, /usr/local/groundwork/config/bronx.cfg, and parameter listener_max_packet_age needs to be updated. Set this value to 900 seconds to allow for 15 minutes of GDMA spooling. Longer durations are possible, but may result in transient overload conditions on the GroundWork server while large data volumes are processed.
Similarly, packets will be dropped by Bronx if they contain a future timestamp. This can be an issue in environments where perfect time synchronization is not possible. Setting the listener_max_packet_imminence parameter will compensate for a small amount of future time variance between the monitored node and the Target server. We suggest leaving the default of 1 second unless this is determined to be a problem in the environment.
Finally, the use_client_timestamp parameter should be left at the default of 1, to allow the timestamp from the monitored node to be used. This is useful in collecting the performance data and graphing it in time series graphs in the interface. If this parameter is set to 0, the server timestamp will be used, and graphing may not be accurate.
The following settings are from the Bronx configuration file: /usr/local/groundwork/config/bronx.cfg
| If any changes to the bronx.cfg file are needed, Nagios must be restarted to put them into effect: /etc/init.d/groundwork restart nagios |
# LISTENER MAX PACKET AGE
# The max allowed age, in seconds, of the passive check result received.
# Any older results are dropped to the floor.
# The maximum allowed value is "900" seconds.
# Set the value to "0" to accept passive checks with older timestamps.
# If not specified, the value will be "30" seconds.
listener_max_packet_age=900
# LISTENER MAX PACKET IMMINENCE
# The max allowed "future age", in seconds, of the passive check result received.
# Any newer results are dropped to the floor.
# The maximum allowed value is "900" seconds.
# Set the value to "0" to disallow passive checks with newer timestamps.
# If not specified, the value will be "1" second, which should be just
# enough to allow for possible slight discrepancies which can arise even
# between time-synchronized client and server machines. In general, we
# highly recommend that the site use NTP or similar time-synchronization
# software to tie together the software clocks on disparate machines to
# high accuracy, to prevent misunderstandings about when events actually
# occur. Note that time synchronization for a VM guest machine can be
# problematic; see your vendor's documentation on this topic.
#listener_max_packet_imminence=1
# USE CLIENT TIMESTAMP
# This parameter, if set to a positive value, configures the listener thread
# to use the timestamp in the passive check result received for processing,
# rather than the time on the server when the check result is processed.
# To prevent confusion in handling data from clients which are not
# time-synchronized to the server, such a check result timestamp will be
# automatically overridden and replaced with the server timestamp if the
# passive check result timestamp is found by the server to be in the future.
# If not specified, the value will be "1".
#use_client_timestamp=0
Freshness Checking
The Check service freshness option determines whether or not Nagios will periodically check the freshness of service results. Historically Freshness checking has not been enabled at a global level in the GroundWork Monitor default Nagios Main Configuration, and this will suppress freshness checking for GDMA-run services. Enabling this option is useful for ensuring that passive checks are received in a timely manner. A checked value means the freshness checking is enabled. This setting should be verified and enabled on a GDMA target server.
- From the Configuration menu options, select Control.
- Expand the Nagios main configuration option, and select Freshness Check.
- Scroll down to the Freshness Check Options area to verify that Check service freshness is enabled (checked), and proceed to save the setting.

Create GDMA Build Directory
This is the location that will be used for building and distribution of GDMA host configurations.
As user root create the directory and change ownership to user nagios.
#mkdir /usr/local/groundwork/apache2/htdocs/gdma
#chown nagios.nagios /usr/local/groundwork/apache2/htdocs/gdma
All other steps are contained in the relevant upgrade sections below under GDMA Setup and Installation. You may wish to take advantage of the Auto Configuration features of GDMA. If so, see the Auto Configuration Setup section below before proceeding.
2.0 Starting and Stopping GDMA
GDMA runs on a variety of platforms, each with their own special way of starting and stopping the GDMA daemons. We recommend the following for controlling the daemons in ordinary production use.
| PLATFORM | START | STOP | FIND STATUS |
|---|---|---|---|
| AIX | startsrc -s gdma | stopsrc -s gdma | lssrc -s gdma |
| Linux | service gdma start | service gdma stop | service gdma status |
| Solaris | /etc/init.d/gdma start | /etc/init.d/gdma stop | |
| Windows | net start gdma | net stop gdma |
3.0 Auto Configuration Setup
3.1 Theory of Operations
The Auto Configuration feature of GDMA enables GDMA agents to be deployed to Target systems without needing to provide a host specific configuration at installation time. When GDMA is first installed and started without a configuration it will operate in Auto Configuration mode. While in Auto Configuration mode the agent will periodically perform a basic discovery of the monitored host system and transmit the discovery information to a predefined parent system. The predefined host name must be added to DNS, so that the monitored hosts will resolve it as the GroundWork Target server. This information can then be used by the GroundWork Monitor administrator to configure a host-specific configuration for the new monitored host. When the host-specific configuration is available, it will be retrieved by the agent and the agent will self-configure and switch to normal operation.
3.2 Auto Configuration Operations
The following is a description of the sequence of operations that occur when a new GDMA is deployed in Auto Configuration mode. It is useful to understand this process so that the messages received and displayed on the GroundWork Monitor user interface can be understood.
When the agent is first started both the poller and spooler engines are started.
Basic Poller Operation in Auto Configuration Mode
- Poller reads: gdma_auto.conf
- Poller checks for the presence of a local host configuration file
- Poller attempts to retrieve a host configuration file from the location defined by gdma_auto.conf
- If it fails to download a host configuration file it sleeps until Poller_Proc_Interval has expired and starts at step 1
Basic Spooler Operation in Auto Configuration Mode
- Spooler reads: gdma_auto.conf
- Spooler checks for the presence of a local host configuration file
- If the host configuration file is not present the spooler transmits an auto configuration message
- Spooler sleeps until Spooler_Proc_Interval has expired and restarts starts at step 1
- The message is sent via NSCA as a service check result.
- The message is sent to the Target server as coming from the host defined by the GDMA_Auto_Host parameter (default is gdma-autohost) and the service defined by GDMA_Auto_Service (default is gdma_auto).
- The message payload contains the hostname, IP address and operating system information

3.3 Create DNS Entry for gdma-autohost that points to the GroundWork Server
The GDMA agent relies on DNS to resolve the preconfigured hostname gdma-autohost to the Target server where it will submit its check results, and attempt to pick up its configuration file. Using whatever DNS system is available on your network, ensure that the system to be monitored with GDMA can resolve the name gdma-autohost to the GroundWork server.
Step 1 - Import GDMA Auto Configuration Profile
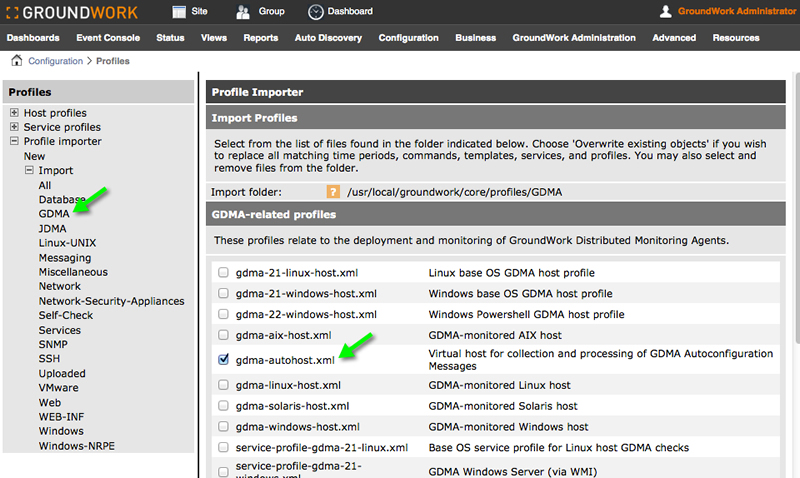
The GDMA Auto Configuration profile provides a template for the auto-configuration virtual host. In order to properly process the messages from the GDMA hosts in Auto Configuration mode, this profile must be loaded using the following procedure.
- From the Configuration menu options, select Profiles.
- Select Profile importer, and the GDMA category.
- Toggle the checkbox to select gdma-autohost.xml and select Import at the bottom of the screen.
Step 2 - Create GDMA Auto Configuration Virtual Host
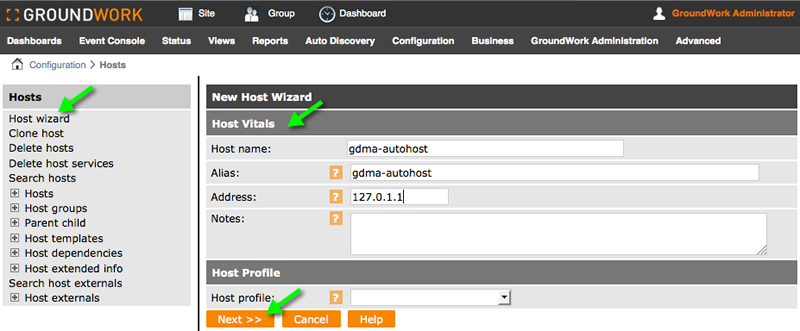
This virtual host serves as a collection point for notifications and alerts from unconfigured GDMA agents.
- From the Configuration menu options, select Hosts.
- Select Host Wizard and fill in the Host Name as gdma-autohost.

This name is controlled by the GDMA_Auto_Host configuration parameter. Do not modify this path without also modifying all the requisite GDMA agent configurations. - Fill in Alias as gdma-autohost and the Address as 127.0.0.2.

Nagios and GroundWork require that all IP addresses for configured hosts be unique. Ensure that the address used here is unique in the configuration. - Select gdma-autohost as the Host profile.
- Select Next (4x), then select Continue.

If you are using clone host or another method for creating this host, please ensure it has no externals associated, or you may see an error when running externals related to the distribution directory. The gdma-autohost and its services should have no externals. - Commit changes (Configuration > Control > Commit) to activate. The system is now configured to receive auto configuration messages from GDMA targets. The GDMA Target server configuration for Auto Configuration is now complete. You should periodically check your configuration for new hosts as you deploy the GDMA in your organization. These hosts should be placed in hostgroups and the configuration committed.
Important Notes
- You may optionally place the gdma-autohost in a hostgroup and configure notification options.
- Your choice of host profile and configuration group in later steps may be matched to operating system in the gdma_auto.pl script.
- The mapping is controlled by the following structure:
"linux;gdma-21-linux-host;unix-gdma-2.1",
"MSWin32;gdma-21-windows-host;windows-gdma-2.1",
"linux 2.6.9-42.0.3.elsmp;gdma-21-linux-host;unix-gdma-2.1",
"MSWin32 5.00;gdma-21-windows-host;windows-gdma-2.1"
- You may change these defaults, or add matches to the list, by editing the script, as long as you maintain the quoted, comma-delimited string of: os string;host_profile;monarch_group
- The last encountered match is what will be used, so you should place general matches first, and more specific matches later in the list.
4.0 GDMA Setup and Installation
The GDMA profiles include;
- gdma-21-linux-host.xml - Linux base OS GDMA host profile
- gdma-21-windows-host.xml - Windows base OS GDMA host profile
- gdma-22-windows-host.xml - Windows Powershell GDMA host profile
- gdma-aix-host.xml - GDMA-monitored AIX host
- gdma-autohost.xml - Virtual host for collection and processing of GDMA Autoconfiguration Messages
- gdma-linux-host.xml - GDMA-monitored Linux host
- gdma-solaris-host.xml - GDMA-monitored Solaris host
- gdma-windows-host.xml - GDMA-monitored Windows host
4.1 Windows GDMA Installation
The Windows GDMA installation requires several new profiles to be present on the Target GroundWork server. These profiles must be loaded on the system and applied to the GDMA monitored node hosts. Windows GDMA hosts must be additionally organized into configuration groups. Configuration groups (aka Monarch Groups) are used to control the creation of external (see the Bookshelf document Configuring Externals) definitions used by GDMA agents. This section covers setting up these parameters in a new installation of GDMA.
Prerequisites
The following prerequisites exist for configuring the Windows GDMA:
- Administrative access to GroundWork Monitor and monitored systems and familiarity with the administration of Linux, GroundWork, and Windows systems
- Correct installation of GroundWork Monitor 6.1 or higher (see Product Installation)
- Configuration of GroundWork Target server (see above 1.0 Configuring a GDMA Target Server)
- Backup of the Monarch database (see System Maintenance>Backup and Restore)
- Exclusions for Security Scanning Software - For GDMA to operate properly exclusions need to be made to any security scanning software such as Anti-Virus or Script Scanning products. Both file level and process level exclusions may be needed depending on the security product being used. This is most commonly seen in Windows deployments. The installation path for the binaries that need to be excluded is in the 32-bit program files directory %ProgramFiles(x86)%\groundwork\gdma\bin. The binaries that need exclusions are gdma_poll.exe, gdma_run_checks.exe, gdma_service.exe, gdma_spool_processor.exe and send_nsca.exe.
GroundWork Monitor Target Server Setup
The following steps need to be performed on the GroundWork server designated as the Target server for the Windows GDMA monitored hosts.
Step 1 - Import GDMA Windows Base OS host and service profile
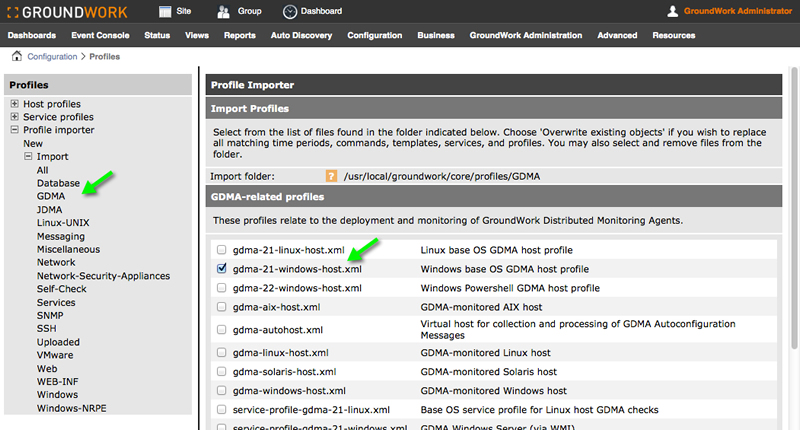
The Windows Base OS profile configuration parameters for the creation of Windows monitored nodes.
- From the Configuration menu options, select Profiles.
- Select Profile importer, and the GDMA category.
- Check the box to select gdma-21-windows-host.xml and select Import at the bottom of the screen.
Step 2 - Review and modify gdma-21-windows host externals properties
- From the Configuration menu options, select Hosts.
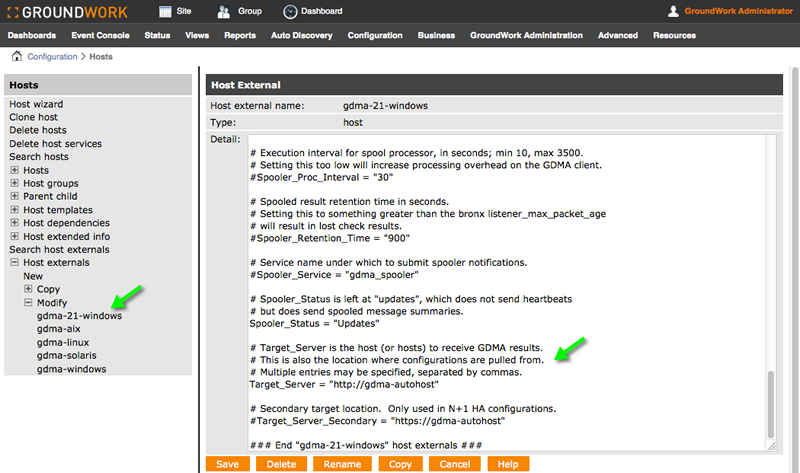
- Select Host Externals, then Modify, and choose gdma-21-windows.
- The Host Externals screen will be displayed. Here you can modify the Target_Server parameter. This parameter controls where GDMA agents will download their configurations from and where they will send check results. The parameter must be in the form of a URL. This parameter is normally set to the hostname or IP address of the master system. For details on this and other configuration parameters refer to the GDMA Configuration Reference. section of Bookshelf. If you are using auto-configuration, you may set this to;
[http://gdma-autohost] - Select Save after you've entered this parameter.
Step 3 - Configure a GDMA Windows Host
If you are using Auto-configuration, you may skip this step.
- From the Configuration menu options, select Hosts.
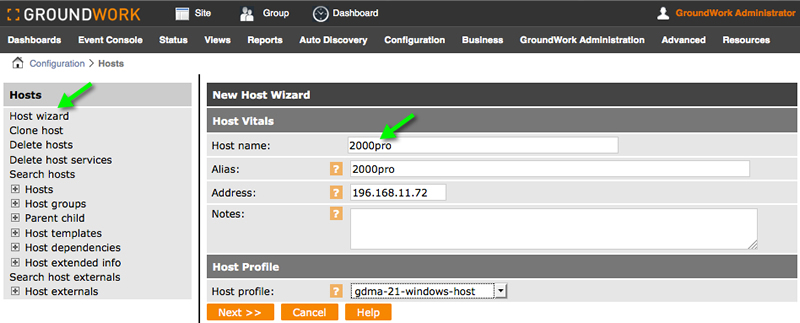
- Select Host Wizard and fill in a Host Name (e.g. 2000pro), Alias (e.g. 2000pro), and an IP Address (e.g. 196.168.11.72).
- Next, select gdma-21-windows-host as the host profile.
- Select Next (4x), then select Continue. You may optionally place the host in a hostgroup and configure additional host, service and notification options.
Step 4 - Add a new host to a Monarch group
If you are using Auto-configuration, you may skip this step.
- From the Configuration menu options, select Groups.
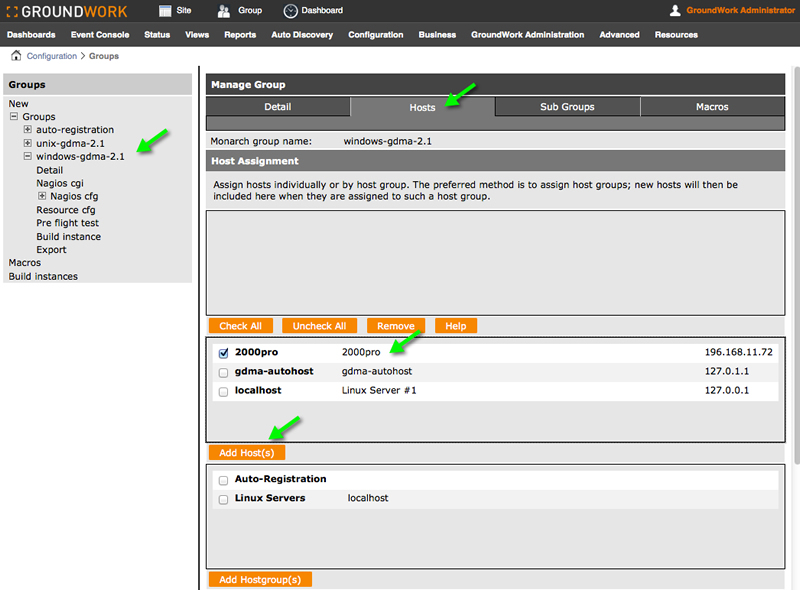
- Expand Groups, expand windows-gdma-21, and select Detail.
- Select the Hosts tab, toggle the checkbox for a host (e.g. 2000pro).
- Select Add Hosts. The host will appear in the upper field as an assigned host.
Step 5 - Commit changes and Build Externals
Commit changes to GroundWork Monitor and create a GDMA configuration file.
- From the Configuration menu options, select Control.
- Select Commit, Backup, Commit.
- Select Build externals.
- The configuration file will be created in /usr/local/groundwork/apache2/htdocs/gdma as defined in the windows-gdma monarch group. The filename will be gwmon_$hostname.cfg (in this example gwmon_2000pro.cfg).
#ls -al /usr/local/groundwork/apache2/htdocs/gdma/gwmon_2000pro.cfg
-rw-r--r-- 1 nagios nagios /usr/local/groundwork/apache2/htdocs/gdma/gwmon_2000pro.cfg
#

4.2 Windows GDMA Client Installation/Upgrade
Use this procedure to install the Windows GDMA on Windows hosts.
Step 1 - Uninstall the legacy client
| If upgrading, you must first uninstall the legacy GDMA client. If you are not upgrading, go to Step 2. |
- Access the Windows client user interface and start a command window.
- Stop the GDMA service with the command:
net stop gdma
- Remove the GDMA service with the command:
sc delete gdma
- Backup any custom plugins you may have added to the GDMA in the c:\groundwork directory structure. You will need to move these to the new location.
- (Optional) Delete the directory c:\groundwork and all sub-directories.
Step 2 - Install a Windows GDMA Client
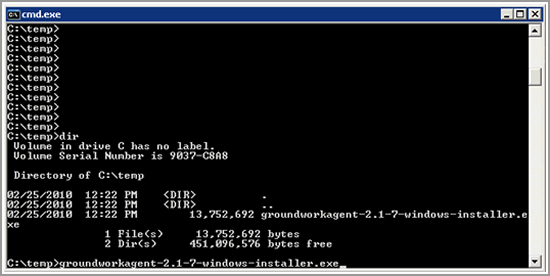
- For Windows the procedure is to open a browser from the desktop.
- Enter the address of the agent in the search box, and accept the download. In the example here we are using GWSERVER as the fqdn of the GroundWork machine;
http://GWSERVER/agents/groundworkagent-2.3.2-80-windows-installer.exe
4.3 Linux GDMA Installation
This section describes the steps necessary to configure GDMA for Linux systems including a basic installation.
Prerequisites
The following prerequisites exist for configuring Linux GDMA;
- GroundWork Monitor 6.1 or later correctly installed
- GroundWork Target server configuration complete
- Administrative access to GroundWork Monitor and monitored systems and familiarity with the administration of Linux, GroundWork, and Windows systems
- Backup of the Monarch database is highly recommended before beginning this operation, (see the System Maintenance>Backup and Restore section in Bookshelf for details)
GroundWork Monitor Target Server Setup
Step 1 - Import GDMA Linux Base OS host and service profile
The Linux Base OS profile provides configuration parameters for the creation of Linux targets.
- From the Configuration menu options, select Profiles.
- Select Profile importer and the GDMA category.
- Check the box to select gdma-21-linux-host.xml and select Import at the bottom of the screen.
Step 2 - Review and modify gdma-21-linux host externals properties
- From the Configuration, menu options, select Hosts.
- Select Host Externals, then Modify and choose gdma-21-linux.
- Here you can modify the Target_Server parameter. This parameter controls where GDMA agents will download their configurations from and where they will send check results. The parameter must be in the form of a URL. This parameter is normally set to the hostname or IP address of the master system. For details on this and other configuration parameters refer to the GDMA Configuration Reference section of Bookshelf.
- Select Save.
Step 3 - Configure a GDMA Linux Host
- From the Configuration menu options, select Hosts.
- Select Host Wizard and fill in a Host Name (e.g. linux_gdma), Alias (e.g. linux_gdma), and an IP Address (e.g. 196.168.11.220).
- Next, select gdma-21-linux-host as the host profile.
- Select Next (4x), then select Continue. You may optionally place the host in a hostgroup and configure additional host, service and notification options.
Step 4 - Add a new host to a Monarch group
- From the Configuration menu options, select Groups.
- Expand Groups, expand unix-gdma-2.1, and select Detail.
- Select the Hosts tab, toggle checkbox for a host (e.g. linux-gdma).
- Select Add Hosts. The host will appear in the upper field as an assigned host.
Step 5 - Commit Changes and Build Externals
Commit changes to GroundWork Monitor and create a GDMA configuration file.
- From the Configuration menu options, select Control.
- Select Commit, Backup, Commit.
- Select Build externals.
- The configuration file will be created in /usr/local/groundwork/apache2/htdocs/gdma as defined in the unix-gdma-2.1 monarch group. The filename will be gwmon_$hostname.cfg (in this example gwmon_linux-gdma.cfg).
#ls -al /usr/local/groundwork/apache2/htdocs/gdma/gwmon_linux-gdma.cfg
-rw-r--r-- 1 nagios nagios /usr/local/groundwork/apache2/htdocs/gdma/gwmon_linux-gdma.cfg
#
4.4 Linux GDMA Client Installation/Upgrade
Use this procedure to install the Linux GDMA on Linux hosts.
Step 1 - Uninstall the legacy client
| If upgrading, you must first uninstall the legacy GDMA client. If you are not upgrading, go to Step 2. |
- Access the client command line interface.
- Backup any custom plugins you may have added to the GDMA in the following directory structure, you will need to move these to the new location:
/usr/local/groundwork
- Delete the following directory and all subdirectories:
/usr/local/groundwork
- Type:
chkconfig gdma off
- Type:
/etc/init.d/gdma stop
- Remove the file /etc/init.d/gdma with the command:
rm /etc/init.d/gdma
- Remove the entire /usr/local/groundwork directory with the command:
rm -Rf /usr/local/groundwork

Linux GDMA can be uninstalled with the script /usr/local/groundwork/uninstall
Step 2 - Install a Linux GDMA client (or other Unix like agents)
- Go to a command line session via SSH on the monitored target.
- Next, transfer the binary installer file to a temporary location on the local disk;
- Login as root user.
- Change to the temporary or other useful directory;
cd /tmp
- Enter one of the following commands to retrieve the binary installer, pick the one that matches your architecture. In the example here we are using GWSERVER as the fqdn of the GroundWork machine. If wget is not available, use curl or whatever is present to access from http;
wget http://<GWSERVER>/agents/groundworkagent-2.3.2-39-aix-installer.runwget http://<GWSERVER>/agents/groundworkagent-2.3.2-72-solaris-intel-installer.runwget http://<GWSERVER>/agents/groundworkagent-2.3.2-72-solaris-sparc-installer.runwget http://<GWSERVER>/agents/groundworkagent-2.3.2-79-linux-32-installer.runwget http://<GWSERVER>/agents/groundworkagent-2.3.2-79-linux-64-installer.run
- Type the following to make the installer executable. If you are using the Auto Configuration feature, you should leave the Target server as gdma-autohost. If not, you should fill in the Target server hostname or IP address. Our example here is for Linux 64.
chmod +x groundworkagent-2.3.2-79-linux-64-installer.run
4.5 GDMA Unattended Mode Installation
If you wish to install the GDMA via a scripted method, such as a software distribution package or a batch script, you may wish to take advantage of the unattended mode option. The capability of running an unattended-mode install applies across all platforms. Our example below uses Linux and the contents of the options file may need to be customized for each type of platform. Type the name of the binary installer followed by --help for a list of available options.
Command Line Example: Launching the Linux installer unattended:
./groundworkagent-2.3.2-79-linux-64-installer.run --mode unattended --optionfile /<path to file>/unattended.txt
unattended.txt argument file contents:
gdma_target_server=demo1
gdma_username=gdma
gdma_protocol=http
gdma_autoregistration_username=gdma
gdma_autoregistration_password=xxxxxx
gdma_autoregistration_hostprofile=gdma-linux-host
gdma_service_start=yes
